
Connection pooling refers to the method of creating a pool of connections and caching those connections so that it can be reused again.
PostgreSQL has a postmaster process, which spawns new processes for each new connection to the database. This process takes up around 2 to 3 MB memory which happens every time you create a connection to the database. Without connection pooling, for each connection, the postmaster process will have to spawn a new process at the back end using 2 to 3 MB memory and this creates a problem if the number of connections are too high (typically seen in mission critical applications). Higher the number of connections, more is the memory consumed for creating these connections.
With Connection pooling, whenever there is a request from the front-end application to create a connection to the database, a connection is created from the pool. After the session or transaction is completed, connection is given back to the pool.
Table of Contents
So how does this help in performance improvement?
In case, there are multiple requests to create a connection to the same database and same username details as the earlier connection – the connection pooler will not create a new connection each time to the database, rather it will reuse the earlier connection from the pool. This helps in preventing the overhead of creating a new connection to the database every time there is a request for a database connection with the same username and database details. Connection pooling helps in environments where there are higher number of concurrent connections to the database.
Though PostgreSQL does not have a built-in connection pooler, most of the clients’ software used as the application server provides its own pooler. PostgreSQL does provide two great tools to solve the problem of wasting resources for every connection to the database.
- PGPOOL
- PGBOUNCER
Both of these tools have been developed by the community keeping in mind the PostgreSQL architecture and are specifically designed for PostgreSQL database. While pgbouncer provides only connection pooling, pgpool provides connection pooling, load balancing, high availability and replication. Either of these tools can be used based on the amount of traffic you expect and the overall architecture of your database. Let’s see how pgbouncer helps in improving your database performance by minimizing the time required to make a database connection.
As explained earlier, Pgbouncer is a lightweight connection pooler for PostgreSQL that dramatically reduces the processing time and resources for maintaining many client connections to one or more databases. Pgbouncer supports three types of pooling when rotating connections:
- Session pooling: A server connection is assigned to the client application for the life of the client connection. PgBouncer releases the server connection back into the pool once the client application disconnects. This is the default method.
- Transaction pooling: A server connection is assigned to the client application for the duration of a transaction. When PgBouncer detects the completion of the transaction, it releases the server connection back into the pool.
- Statement pooling: A server connection is assigned to the client application for each statement. When the statement completes, the server connection is returned into the pool. Multi-statement transactions are not permitted for this mode.
How to install and configure Pgbouncer:
I will be using Pgbouncer version 1.9 on a CentOS 7 machine for this.
Installation:
- Download the pgbouncer-1.9.0.tar.gz file on your Linux machine for installation. You can download it from Pgbouncer Download
- Untar the file, this will create a folder named pgbouncer-1.9.0.
- Please make sure that gcc, libevent-devel and openssl-devel packages are installed before proceeding with configure. Move into the folder pgbouncer-1.9.0 and run:
- ./configure –prefix=/opt/pgbouncer
–prefix will allow you to specify a custom directory for installation. By default, it will be installed in /usr/local
- After configuring, run below command to install Pgbouncer
- make
- make install
- After installation, your configuration files and Pgbouncer run file will be installed in below locations
- /opt/pgbouncer/share/doc/pgbouncer
- /opt/pgbouncer/bin
- To start Pgbouncer in daemon mode, run below command:
- pgbouncer -d /opt/pgbouncer/share/doc/pgbouncer/pgbouncer.ini
Configuration:
- There are two configuration files that are important for Pgbouncer, pgbouncer.ini and userlist.txt
- pgbouncer.ini – This file contains all the parameters that need to be configured for your Pgbouncer
- userlist.txt – This file contains your database username and password for authentication.
- I have configured pgbouncer.ini and userlist.txt as below:
- Pgbouncer.ini
Benchmarkdb and enterprise are the alias names for the two connection strings. Please note, pool_size has been set for testing purpose only. It is not a recommended value. - Userslist.txt
This file takes input as “username” “password”. Where password can be either in plain format or md5 format. We have used md5 formatted password for both the users. - Now just restart the pgbouncer service as below
- pgbouncer -R -d /opt/pgbouncer/share/doc/pgbouncer/pgbouncer.ini
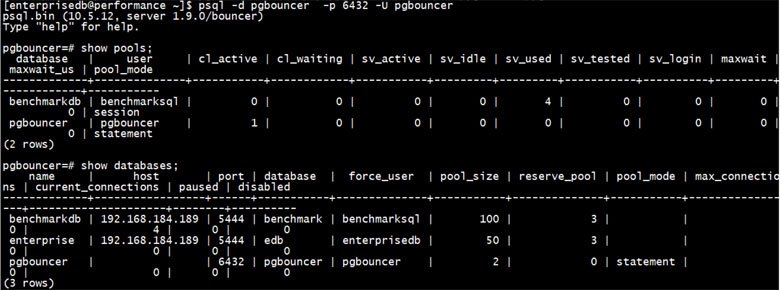
- You can check the pool status and databases by logging into the pgbouncer database as shown below:
- Pgbouncer.ini
Now, to check & validate the impact of connection pooler, we will be using pgbench for benchmarking and pgbouncer in session pooling mode.
- pgbench has been initialized with a scale factor of 30. pgbouncer has pool_size of 100.
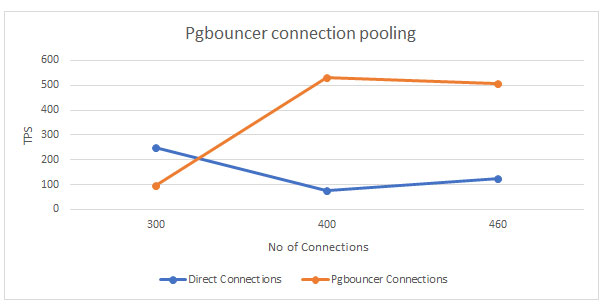
- We will be testing scenarios with increasing concurrent connections starting from 300, 400 and 460. For each connection, pgbench will run 20 transactions which will lead to a total of 6000, 8000 and 9200 transactions respectively.
Below is the output of the test analysis
General activity analysis for connections
- Pgbouncer Connections
- Direct Connections
Tests can be performed with different settings for pool_size and pool_mode for better results as per application needs.
Apart from the pool_size, pool_mode and connection details, you can also set other parameters in pgbouncer configuration file. Some other useful parameters are as follows: –
- min_pool_size – This parameter specifies the minimum number of server connections in pool. At any time, when using pgbouncer, you will see this many number of connections on your server either idle or active.
- reserve_pool_size – Additional connections to be used in case of issues.
- server_idle_timeout (seconds) – All server connections will be removed after being idle for this many second.
- idle_transaction_timeout (seconds) – Close connections which are in ‘idle in transaction’ state for this many second.
- max_client_conn – Total number of clients that can connect.
Finally, to conclude, as seen in the above graphs, with increase in concurrent connections pgbouncer increases the overall throughput. Look out for my upcoming article, I will be getting into more details on pgpool. Watch this space!


